Drip Irrigation Systems
A- Pre-Project Preparation Phase:
Some information is needed to make the project design of the drip irrigation system. We can list them as follows;
a) Land condition: The location, position and slope of the land where the system will be installed must be determined. GPS, Google Earth or Parcel Inquiry Application can be used for these processes.
b) Water source: Determining the location of the water source is important in project design, as well as the type of water source in choosing the filter to be used, and its quality in determining whether it is suitable for agricultural production and the chemicals to be used. In order to determine the water quality, water analysis must be done. The flow of the water source is important for the project design, the number of operations and the irrigation cycle.
c) Soil Physical Structure: Soil analysis should be done in order to determine the physical structure of the soil. According to the data obtained as a result of the analysis, the dripper spacing and the dripper flow rate of the drip irrigation pipe to be used in the system are determined. The physical structure of the soil is also a factor that affects the irrigation time and irrigation cycle.
d) Distance between plant species and between rows and rows: These data are factors that affect the irrigation period and cycle after the system installation as well as in the project design.
After the above-mentioned information is provided for the project design, this information is sent to the project unit.
B- Project Design Phase:
The most appropriate project design is made by experts in the field in the light of the data delivered to the project unit by the farmers, dealers or agronomists. According to the project design, the material list is prepared and made ready for the proposal.
C- Assembly and Control Phase:
1) Field Crops Above Ground Drip Irrigation
1.1 Laying the Drip Irrigation Pipes
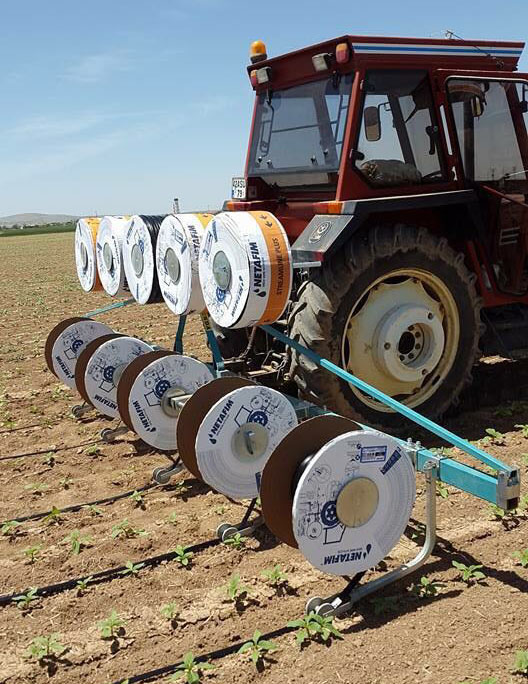
Laying machines with 5 or 7 rows can be used for laying drip irrigation pipes. The paver legs and rollers are adjusted to center the two rows. The laying machine must be designed in such a way that it will not damage the drip irrigation pipe and drippers. Dripline rolls must be installed on the rollers of the laying machine in the correct direction so that the drippers can be laid upside down. How the rolls are attached can also be seen on the cartons on the roll. Leaving more than 2 meters of drip irrigation pipe at the start and end points during the laying process eliminates the negative effect of shrinkage/shortening that may occur in the pipes due to the hot-cold difference. While laying, drip irrigation pipes can be fixed with stakes or held by one or two people. In addition, at least two people must be present and observed during laying, in order to quickly change the rolls, to intervene immediately in an event that will damage the pipes (such as the drip tube getting stuck between the roll cardboard or the reel on the feet or rubbing it on a hard floor).
1.2 Installation of the Filter System
If the number of working teams is sufficient, the filter system can be installed while the drip irrigation pipe is laid. It is beneficial for the system that the ground on which the filter system will be installed is flat and if possible, concrete. Using a mounted filter system with a stand is an advantage in terms of shortening the assembly time. The filter system to be used is suitable for the type and flow of the water source; manometer, vacuum breaker and, if necessary, pressure stabilization and overpressure relief valves.
1.3 Installation of Main Line and Submain Pipes
On the land where the drip irrigation pipe has been laid and the filter system has been installed, the next process is the assembly of the main line and submain lines with the diameter, length and features desired in the project. If the valve is to be used, the valves with the desired features in the project are mounted at the specified places with appropriate fasteners.
The connection of drip irrigation pipes to the submain line can be done in two ways, depending on the type of submain pipe to be used. If FlexNet pipe is used, the connection can be made with ½” threaded elbow, Te or mini valve fitting materials. If PE pipe is used, it can be done with a sealed outlet nipple or mini valve.
Blind plugs can be used to blind the ends of the drip irrigation pipes, as well as a 4-5 cm piece to be cut from the drip pipe. Of course, it would be more appropriate to do this after the drip pipes are tightened and water is supplied to the system.
1.4 Water Supply to the System and Controls
It is important for system safety that the water is drained for a certain period of time before it is supplied to the system. When water is supplied to the system for the first time, it is not desired that the water goes to the drip irrigation pipes in the first place. Because there is a risk of blocking the drip pipes of soil pieces or other contaminants that will remain in the main line and submain line during installation. First of all, water is allowed to flow from the ends of the main line and then the submain line for a certain period of time. It is more appropriate to do the blanking process after the water comes from the end of the drip irrigation pipes.
According to the project design, the required number of valves is opened and the system is put under pressure. It is checked whether the filter inlet and outlet pressure, main line pressure, submain pressure and the pressure values at the end of the drip irrigation pipe are suitable for the project.
The pressure values that are suitable and controlled according to the project are noted. It is important to check these pressure values in certain periods in order to understand whether the system is working properly.
2) Field Crops Underground Drip Irrigation
2.1 Field Preparation
Before laying the drip irrigation pipes under the ground, it is necessary to plow the field in two directions with machines that deeply work the soil (such as a bottom-blaster) and to clear it. Deep ploughing is important for breaking the base stone (plow base) and leveling is important for standardizing the burial depth.
2.2 Laying the Drip Irrigation Pipes
First of all, it should be noted that the pipe to be used in underground applications is different from the pipe used in above-ground applications. Dripnet PC AS or Dripnet PC AS XR drip pipes should be used for this.
For laying drip irrigation pipes, 2 or 3 rows of underground drip irrigation pipe laying machines can be used depending on the soil structure and the power of the work machine to be used. Laying machine legs and rollers should be adjusted in accordance with the desired row spacing (80-100 cm) in the project. The laying machine must be designed in such a way that it will not damage the drip irrigation pipe and drippers. Laying machines with markings (markers) on their sides are important for correct row spacing. Embedding depth is made by placing the machine on a flat surface and adjusting the height of the press wheels next to it. This adjustment is made so that the distance between the point where the drip irrigation pipe exits the foot of the paving machine and the lowest point of the presser wheel is 30 cm. Sometimes these depth settings can vary between 20-35 cm.
As in above-ground applications, the drippers should be placed upwards and the rolls are placed on the reels accordingly.
When starting the laying process, it may be necessary to start the laying process 2-3 m from the back, since the intended embedment depth cannot be reached in the first place. If there is no such possibility, a channel wide enough to fit the foot of the paving machine can be dug at the place where the burying process will be started first, and the laying process can always be started from this point. If this is not possible, as a last resort, a pillow head can be made in 4-6 rows of drip pipes and the project can be designed accordingly.
When starting the laying process, the drip pipes must be kept fixed for a certain period of time. It is ideal that there are at least two people in order to change the rolls quickly and to prevent the pipes from being damaged. At certain times, both the embedding depth and the spacing between rows should be checked.
2.3 Installing the Filter System
If the number of working teams is sufficient, the filter system can be installed while the drip irrigation pipe is laid. It is beneficial for the system that the ground on which the filter system will be installed is flat and if possible, concrete. Using a mounted filter system with a stand is an advantage in terms of shortening the assembly time. The filter system to be used is suitable for the type and flow of the water source; manometer, vacuum breaker and, if necessary, pressure stabilization and overpressure relief valves. It is preferable to use fully automatic filters such as Filtomat or Sigma in underground applications.
 2.4 Excavation Works
After the completion of the placement of the drip irrigation pipes under the ground, the excavation process is started for the main line and submain lines. Generally, the channel opened with a depth of 1 meter and a width of 40-60 cm is sufficient. Of course, these dimensions may vary depending on the pipe diameter to be used and the project design. It is important for the pipes to be used that the inner floor of the excavated area is flat and without clods. The drip pipes should not be damaged while excavating.
 2.5 Valve groups
In case of sufficient number of workers, making valve groups while the excavation with paving continues or before these operations are started speeds up the work. When making valve groups, attention should be paid to the use of pressure regulated valves, double and one-way air valves and manometers according to the place of use. The fact that the elements that make up the valve groups are made of materials resistant to at least 10 bar provides protection against external factors. In underground applications, it is recommended to use a 3" or 4" mesh filter as a control filter before or after the valve groups for the safety and long-term use of the system.
 2.6 Installation of Mainline and Submain pipes
PE or PVC pipe can be used as main line and submain line. According to the project, while the main line and submain lines with the desired features are assembled, the valve groups that have been prepared before or prepared at that time are also assembled. The connection between the drip pipe and the submain pipe can be made with ready-made Qflex pipes or with sprouts prepared from blind pipes. The point to be considered here is to drill the submain line (PVC or PE pipe) to be used with the appropriate drilling tool and use the appropriate gasket and outlet nipple. This situation, which is valid in the submain line, is valid in the flushing line.
If a cabled automation system is to be used in the system, the cables must be laid before or after the pipes are covered (covering the pipe at a certain level). During laying, the cables should not be damaged, the cable should not be stretched, and if splicing is to be made between the cables, this must be done on the ground.
2.7 Water Supply to the System and Controls
Before the water is supplied to the system, it is important for system safety that the water is drained for a certain period of time from the discharge valves on the main line, then the discharge valves on the submain line, and finally the discharge valves on the flushing line. Thus, the pollutants remaining in the pipes are removed from the system.
According to the project design, the filter system, valve groups and the pressures at the end of the system and the amount of water passing through the water meter are checked and noted for comparison in later controls.
3) Aboveground and Underground Drip Irrigation in Orchards
We can list the differences between the underground drip irrigation system in orchards and the above-ground drip irrigation system as follows;
The drip irrigation pipe to be used in underground applications is different from the pipe used in above-ground applications. In underground applications, DripNet PC AS, DripNet PC AS XR, UniRam AS or UniRam AS XR are used.
Drip irrigation pipes are buried 30-40 cm deep into the soil with suitable machines in underground applications.
In underground applications, there is a flushing line at the end of the drip lines.
In underground applications, there is a control filter in the valve groups. Water meter, manometers and vacuum breakers become even more important.
Except for the items listed above, other transactions are generally similar.
3.1 Laying the drip irrigation pipes
In underground applications, a single row burial is done with a suitable machine with 1 or 2 rows, on both sides of the sapling or tree, or in the middle of two trees depending on the fruit type and age. While burying, it may be necessary to start from 2-3 m back in order to ensure the embedding depth, and if this is not possible, it may be necessary to dig a pit such that the foot of the burying machine will sink in the channel or in each row.
In above-ground applications, drip irrigation pipes can be laid by means of a construction machine, while laying can be done manually with a suitable tool/machine.
 3.2 Installing the filter system
If the number of working crew is sufficient, the filter system can be installed while the drip pipe laying process continues. It is beneficial for the system that the ground on which the filter system will be installed is flat and if possible, concrete. The filter system to be used is suitable for the type and flow of the water source; manometer, vacuum breaker and, if necessary, pressure stabilization and overpressure relief valves. It is preferable to use fully automatic filters such as Filtomat or Sigma in underground applications.
3.3 Excavation works
After the completion of the placement of the drip pipes under the ground, the excavation process is started for the main line and submain lines. Generally, the channel opened with a depth of 1 meter and a width of 40-60 cm is sufficient. Of course, these dimensions may vary depending on the pipe diameter to be used and the project design. It is important for the pipes to be used that the inner floor of the excavated area is flat and without clods. The drip pipes should not be damaged while excavating. If the excavation is to be carried out in the middle of the field, the drip pipes can be cut before or during the excavation.
3.4 Valve groups
In case of sufficient number of workers, making valve groups while the excavation with paving continues or before starting these operations speeds up the work. When making valve groups, attention should be paid to the use of pressure regulated valves, double and one-way air valves and manometers according to the place of use. The fact that the elements that make up the valve groups are made of materials resistant to at least 10 bar provides protection against external factors. In underground applications, it is recommended to use a 3" or 4" mesh filter as a control filter before or after the valve groups for the safety and long-term use of the system.
3.5 Installation of mainline and submain pipes
PE or PVC pipe can be used as main line and submain line. According to the project, while the main line and submain lines with the desired features are assembled, the valve groups that have been prepared before or prepared at that time are also assembled. The connection between the drip pipe and the submain pipe can be made with ready-made Qflex pipes or with sprouts prepared from blind pipes. The point to be considered here is to drill the submain line (PVC or PE pipe) to be used with the appropriate drilling tool and use the appropriate gasket and outlet nipple. This situation, which is valid for the submain line in underground applications, is valid for the flushing (discharge) line. In above-ground applications, the sprout/blind pipe should be 40-50 cm longer than the soil level or more as the case may be.
If the cabled automation system is to be used in the system, the cables must be laid before or after the pipes are covered. During laying, the cables should not be damaged, the cable should not be stretched, and if splicing is to be made between the cables, this must be done on the ground.
3.6 Supplying water to the system and controls
Before the water is supplied to the system, it is important for system safety that the water is drained for a certain period of time from the discharge valves on the main line, then the discharge valves on the submain line, and finally the discharge valves on the flushing line, if it is underground. Thus, the pollutants remaining in the pipes are removed from the system.
According to the project design, the filter system, valve groups and the pressures at the end of the system and the amount of water passing through the water meter are checked and noted for comparison in later controls.
D- Support Phase After System Installation
After the system installation is completed and the necessary controls are made, the field or garden where the installation is made in certain periods is visited by experts in the field.
It will be recommended by experts; It is important to comply with the irrigation program, to make the necessary acid and fertilizer applications, to maintain the filter system and other elements at certain periods.